6 Refine the ECS container infrastructure
Now it is time to build a service, running in Elastic Container Service (ECS)!
In the previous chapter, we set up an ECS cluster to run our containers using Fargate, so that we do not need to bother with underlying server infrastructure for the containers. We also added a Task Definition, so that we could manually start the container and get the web application running.
We had a list of goals, which we could cover partially:
- Expose an endpoint for a web server for HTTP traffic from internet.
- Web server shall run in a container.
- The container itself shall not be directly reachable from internet.
- We should be able to have a service set up so that containers will automatically be started if needed.
- We should be able to build our custom solution for this web server.
- We should be able to get container images from a container registry.
- We do not care about managing the underlying server infrastructure that runs the containers. I.e., we will use Fargate.
Let us now address more points in the goal list, one by one. We got the web application task definition, but had to start a task or create a service manually to make it run. Let us remove that manual step. We can accomplish this by setting up an ECS Service for the web application.
6.1 Setting up an ECS Service
An ECS Service will allow us to have a container running, and if the container fails, ECS will start up a new instance of a container automatically. Looking at the AWS CDK documentation, we can see that we have a FargateService class we can use. Let us think a bit about what we need to provide:
- The cluster the service should run in
- The task definition to run as a service
- The desired number of task instances we should run
- Any port openings to allow traffic to the container
- Optionally, a name for the service
To allow traffic to the service, we need a security group. In that security group, we specify rules for which inbound traffic is allowed.
So we have 5 pieces of information to include. On top of these, we also should provide a logical id for the service, and we add the scope which the service is added to. Let us create a function skeleton for this:
def add_service(
    scope: cons.Construct,
    id: str,
    cluster: ecs.Cluster,
    taskdef: ecs.FargateTaskDefinition,
    port: int,
    desired_count: int,
    service_name: str = None,
) -> ecs.FargateService:
    pass
In the function body, we add code to create a security group, and add an ingress rule for the port we provide.
We will then also create the service using FargateService, passing in our parameters. Finally, we will return to the service construct. The result looks like this:
def add_service(
    scope: cons.Construct,
    id: str,
    cluster: ecs.Cluster,
    taskdef: ecs.FargateTaskDefinition,
    port: int,
    desired_count: int,
    service_name: str = None,
) -> ecs.FargateService:
    name = service_name if service_name else ""
    sg = ec2.SecurityGroup(
        scope,
        f"{id}-security-group",
        description=f"security group for service {name}",
        vpc=cluster.vpc,
    )
    sg.add_ingress_rule(ec2.Peer.any_ipv4(), ec2.Port.tcp(port))

    service = ecs.FargateService(
        scope,
        id,
        cluster=cluster,
        task_definition=taskdef,
        desired_count=desired_count,
        service_name=service_name,
        security_groups=[sg],
    )
    return service
The function code uses the id provided for the service construct to generate an id for the security group in the function. We make a call to add an ingress rule (incoming traffic) from anywhere using the specified TCP port. This is similar to what the AWS Console experience would generate for us. We essentially replicate this for now, but this is not what we want to have in the end.
Now we need to add a call to our new function in our main program, to add the service to our existing code from the previous chapter with the ECS cluster and task definition. The call itself is pretty much a single line in what we have already written before. Notice here that I picked the family name from the task configuration to generate an id value for the service. The desired count for the service is a single task instance.
containers.add_service(
    stack, f"service-{taskconfig['family']}", cluster, taskdef, 8000, 1
)
Now let us put this into its context and look at the code for the whole main program again. We retrieve data for the existing default VPC, which we use when we set up an ECS cluster. We define an ECS task definition using the app runner demo image, and we use this information to define an ECS service that should run with a single instance of that task.
The main program of our code now looks like this:
import os
import aws_cdk as cdk
from aws_cdk import (
    aws_ec2 as ec2,
)
import containers

app = cdk.App()
env = cdk.Environment(
    account=os.getenv("CDK_DEFAULT_ACCOUNT"), region=os.getenv("CDK_DEFAULT_REGION")
)
stack = cdk.Stack(app, "my-container-infra", env=env)

vpc = ec2.Vpc.from_lookup(stack, "vpc", is_default=True)

cluster = containers.add_cluster(stack, "my-test-cluster", vpc)

taskconfig: containers.TaskConfig = {
    "cpu": 512,
    "memory_limit_mib": 1024,
    "family": "webapp",
}
containerconfig: containers.ContainerConfig = {
    "image": "public.ecr.aws/aws-containers/hello-app-runner:latest",
}
taskdef = containers.add_task_definition_with_container(
    stack, f"taskdef-{taskconfig['family']}", taskconfig, containerconfig
)

containers.add_service(
    stack, f"service-{taskconfig['family']}", cluster, taskdef, 8000, 1
)

app.synth()
We can also look at our container management module and see the functions and data structures we currently have in place there:
from typing import Literal, TypedDict  # noqa
import constructs as cons
from aws_cdk import (
    aws_ec2 as ec2,
    aws_ecs as ecs,
)


class TaskConfig(TypedDict):
    cpu: Literal[256, 512, 1024, 2048, 4096]
    memory_limit_mib: int
    family: str


class ContainerConfig(TypedDict):
    image: str


def add_task_definition_with_container(
    scope: cons.Construct,
    id: str,
    task_config: TaskConfig,
    container_config: ContainerConfig,
) -> ecs.FargateTaskDefinition:
    taskdef = ecs.FargateTaskDefinition(
        scope,
        id,
        cpu=task_config["cpu"],
        memory_limit_mib=task_config["memory_limit_mib"],
        family=task_config["family"],
    )

    image = ecs.ContainerImage.from_registry(container_config["image"])
    image_id = f"container-{_extract_image_name(container_config['image'])}"
    taskdef.add_container(image_id, image=image)

    return taskdef


def add_service(
    scope: cons.Construct,
    id: str,
    cluster: ecs.Cluster,
    taskdef: ecs.FargateTaskDefinition,
    port: int,
    desired_count: int,
    service_name: str = None,
) -> ecs.FargateService:
    name = service_name if service_name else ""
    sg = ec2.SecurityGroup(
        scope,
        f"{id}-security-group",
        description=f"security group for service {name}",
        vpc=cluster.vpc,
    )
    sg.add_ingress_rule(ec2.Peer.any_ipv4(), ec2.Port.tcp(port))

    service = ecs.FargateService(
        scope,
        id,
        cluster=cluster,
        task_definition=taskdef,
        desired_count=desired_count,
        service_name=service_name,
        security_groups=[sg],
    )
    return service


def add_cluster(scope: cons.Construct, id: str, vpc: ec2.IVpc) -> ecs.Cluster:
    return ecs.Cluster(scope, id, vpc=vpc)


def _extract_image_name(image_ref):
    name_with_tag = image_ref.split("/")[-1]
    name = name_with_tag.split(":")[0]
    return name
Before we try to deploy this solution, we should have a few things in mind:
- If you deploy an ECS Service with a desired count > 0, it will try to start the task during the deployment
- Deployment is only considered successful if the desired count has been reached and considered being in a healthy state
- By default, deployment to ECS can get stuck if the service does not work.
To reduce potential waiting times if we get any trouble, there are two things we want to do here. First, let us set the desired count for the service to 0. This means that AWS CDK (and ECS) will provision the service, but will not try to start it.
Second, we can tell ECS to use a circuit breaker pattern for the deployment What this means is that it will try a few times to run the service, and if that does not work, it will roll back the deployment.
Let us update the code to include both
To set the desired count to 0, we simply change the count parameter to the add_service() call:
containers.add_service(
    stack, f"service-{taskconfig['family']}", cluster, taskdef, 8000, 0
)
To apply the circuit breaker pattern, we have a property circuit_breaker on FargateService for this. When we specify a DeploymentCircuitBreaker class here, we can also say that it should roll back the deployment in case there is an error. In this way, we can get back to the previous state of the service if the updated deployment fails. The updated add_service() code now looks like this:
def add_service(
    scope: cons.Construct,
    id: str,
    cluster: ecs.Cluster,
    taskdef: ecs.FargateTaskDefinition,
    port: int,
    desired_count: int,
    service_name: str = None,
) -> ecs.FargateService:
    name = service_name if service_name else ""
    sg = ec2.SecurityGroup(
        scope,
        f"{id}-security-group",
        description=f"security group for service {name}",
        vpc=cluster.vpc,
    )
    sg.add_ingress_rule(ec2.Peer.any_ipv4(), ec2.Port.tcp(port))

    service = ecs.FargateService(
        scope,
        id,
        cluster=cluster,
        task_definition=taskdef,
        desired_count=desired_count,
        service_name=service_name,
        security_groups=[sg],
        circuit_breaker=ecs.DeploymentCircuitBreaker(
                rollback=True,
        )
    )
    return service
Let us now try to deploy this again, and see how this works out! As before, you can run the cdk deploy command to perform the deployment (do not forget to provide your AWS credentials).If you already have the solution from previous chapter deployed, you can run the cdk diff command to see what the updates will be. You can also run cdk diff if nothing is deployed to see a list of the CloudFormation resources that will be deployed.
When the deployment is complete, we should see the service resource in our ECS cluster.
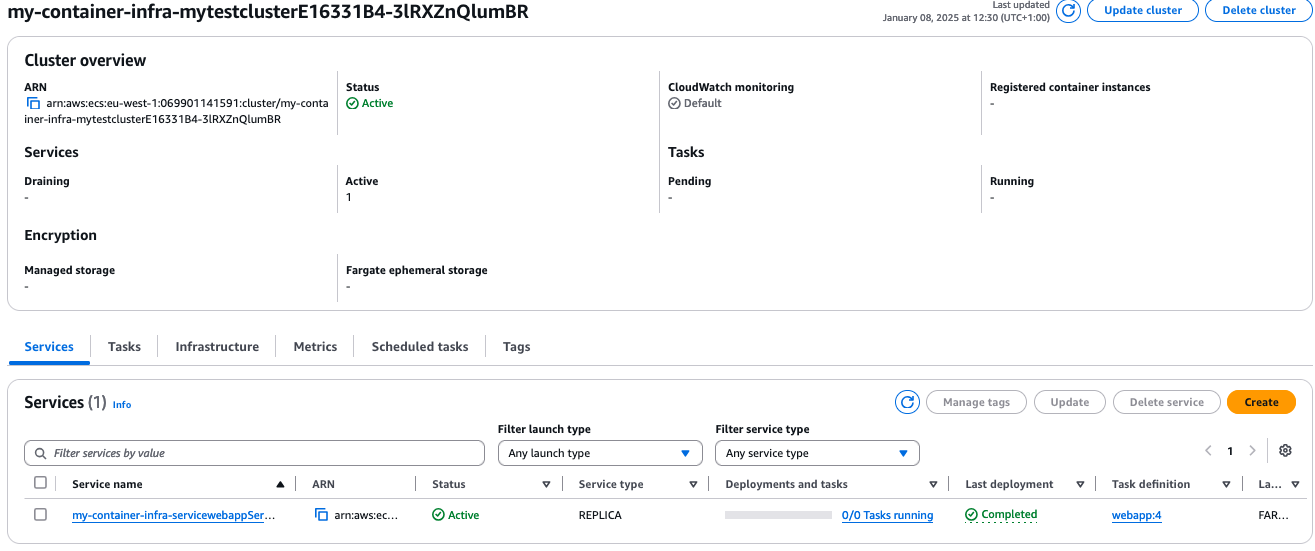

We can see that the desired count is 0, as well as the number of running tasks. This is what we expect with the deployment configuration we specified. So far, so good!
If we click on the Update Service button, we can change the service configuration to set another value for desired count. There are many entries, but we concern ourselves only with the desired count entry. Look for the entry desired tasks and change the value to 1.
Click on the Update button at the bottom of the page. Now it will update the desired count and ECS will try to start the service. You will see that the status for the task is pending. We want it to reach status running and then we can test that we can reach the web app, just as we did with the deployment using AppRunner.
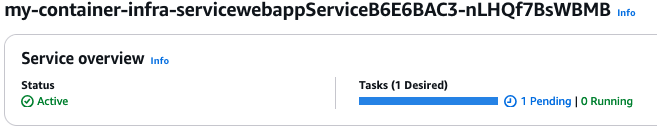
However, you may notice that we do not actually reach state running. It seems to be stuck in pending state, and eventually ECS will stop trying and remove the task. Something has gone wrong. How do we fix this?
6.2 Troubleshooting our deployment
First, let us check if we have any useful logs. We can click around in the ECS Console, and we can look in CloudWatch console under Logs, and we find nothing. This is not so good…
It seems we do not get any useful logs by default, so we need to fix this. Before updating our deployment, let us look further to see if we find anything else that can be useful.
In the detailed information for our service, there is a Configuration and networking section:
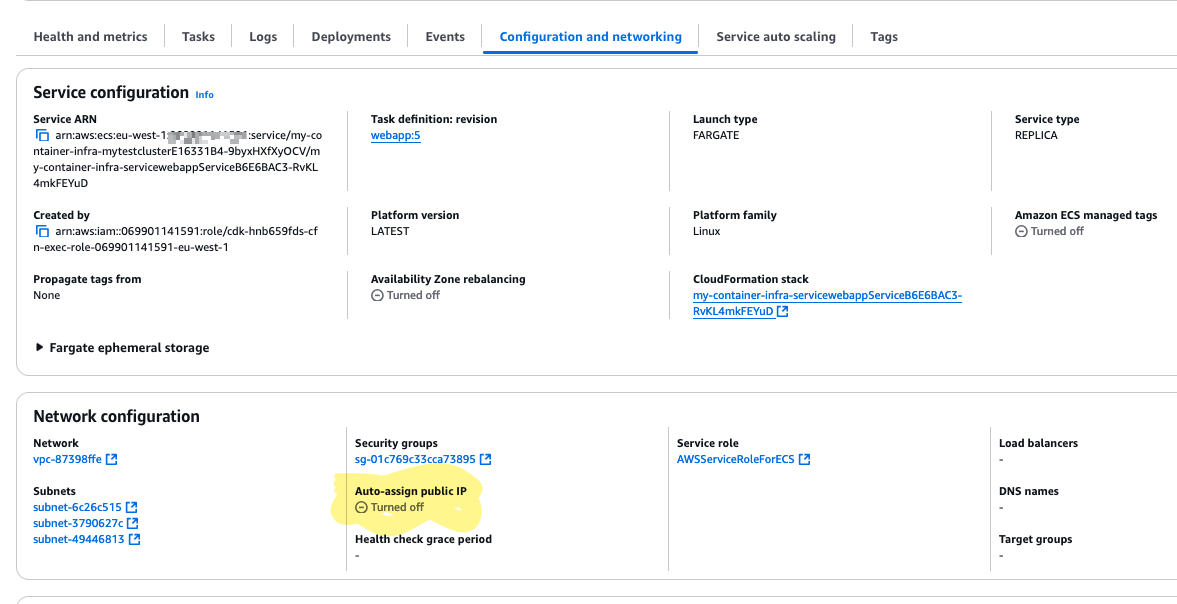
We have a default VPC, and all subnets in the default VPC have public internet access, so the subnet list should probably be ok. We can also check the security group listed and check that this is ok. The fourth entry here says Auto-assign public IP Turned off. Let us just check the security group also:

The security group looks as expected, port 8000 open for everyone. So now we have two things to update:
- Add logging to our deployment
- Change so that a public IP address is assigned to the container.
Remember, this is not the ultimate solution, but we take it in small steps and first we want to have it working at all! So let us see what we should change now.
6.3 Changing the service deployment
If we look at the FargateService documentation again, there is actually an entry there that says assign_public_ip. It is optional, and the default value is false. So let us add a parameter to add_service() function that allows us to set this property.
def add_service(
    scope: cons.Construct,
    id: str,
    cluster: ecs.Cluster,
    taskdef: ecs.FargateTaskDefinition,
    port: int,
    desired_count: int,
    assign_public_ip: bool = False,
    service_name: str = None,
) -> ecs.FargateService:
    name = service_name if service_name else ""
    sg = ec2.SecurityGroup(
        scope,
        f"{id}-security-group",
        description=f"security group for service {name}",
        vpc=cluster.vpc,
    )
    sg.add_ingress_rule(ec2.Peer.any_ipv4(), ec2.Port.tcp(port))

    service = ecs.FargateService(
        scope,
        id,
        cluster=cluster,
        task_definition=taskdef,
        desired_count=desired_count,
        service_name=service_name,
        security_groups=[sg],
        circuit_breaker=ecs.DeploymentCircuitBreaker(
                rollback=True,
        ),
        assign_public_ip=assign_public_ip,
    )
    return service
To add logging to our container, it not as obvious. There isn’t anything obvious on FargateService, and there isn’t anything on the FargateTaskDefinition either. It turns out that there is a logging property we can set when we add the container definition. This property requires a LogDriver object, and we can get an object that handles logging to CloudWatch by using the LogDriver.aws_logs() function. There is one mandatory parameter here, and that is stream_prefix. This will set the first part of the name of the CloudWatch log stream.
For now, let us pick the family name in the task configuration. By default, the logs will be around forever, which perhaps a bit too long. So we can also set the desired retention time for the logs. This is a quite temporary lab experiment, so let us keep the retention time short, just a day.
This means that the add_task_definition_with_container() function gets an update:
def add_task_definition_with_container(
    scope: cons.Construct,
    id: str,
    task_config: TaskConfig,
    container_config: ContainerConfig,
) -> ecs.FargateTaskDefinition:
    taskdef = ecs.FargateTaskDefinition(
        scope,
        id,
        cpu=task_config["cpu"],
        memory_limit_mib=task_config["memory_limit_mib"],
        family=task_config["family"],
    )

    logdriver = ecs.LogDrivers.aws_logs(
        stream_prefix=taskdef.family,
        log_retention=logs.RetentionDays.ONE_DAY,
    )
    image = ecs.ContainerImage.from_registry(container_config["image"])
    image_id = f"container-{_extract_image_name(container_config['image'])}"
    taskdef.add_container(image_id, image=image, logging=logdriver)

    return taskdef
We also need to update the code in our main program file to enable public IP assignment:
containers.add_service(
    stack, f"service-{taskconfig['family']}", cluster, taskdef, 8000, 0, True
)
Now we should hopefully be ready! When you have done the changes, run cdk diff to see that you get changes that reflect the logging updates and the public IP assignment. If that looks ok, then try cdk deploy and deploy the updates.
Once the deployment is done, let us check how we did. The service is deployed, and we can see that our manual modification of desired count is gone, it is set to 0 again. This is what we want.
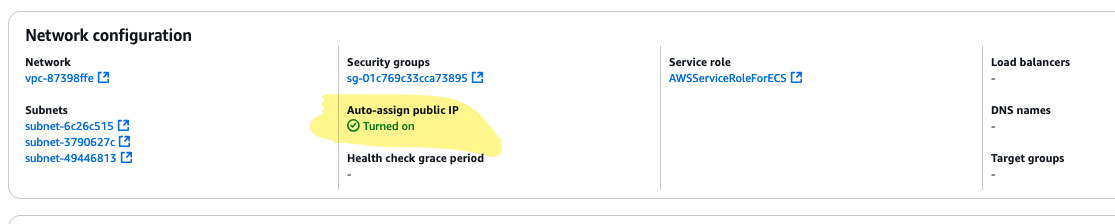
In the details for the service, we look at the Configuration and networking section and see that the value of public IP assignment now is set to enabled:
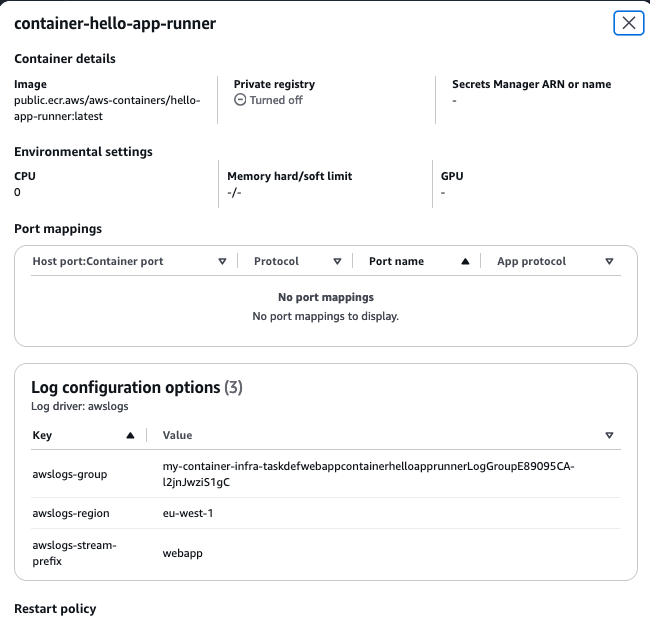
We can then also look in the Log tab, where the logs should appear. This is empty now, since we have not started anything. In the task definition, and in the details for the container, we can see the log configuration:
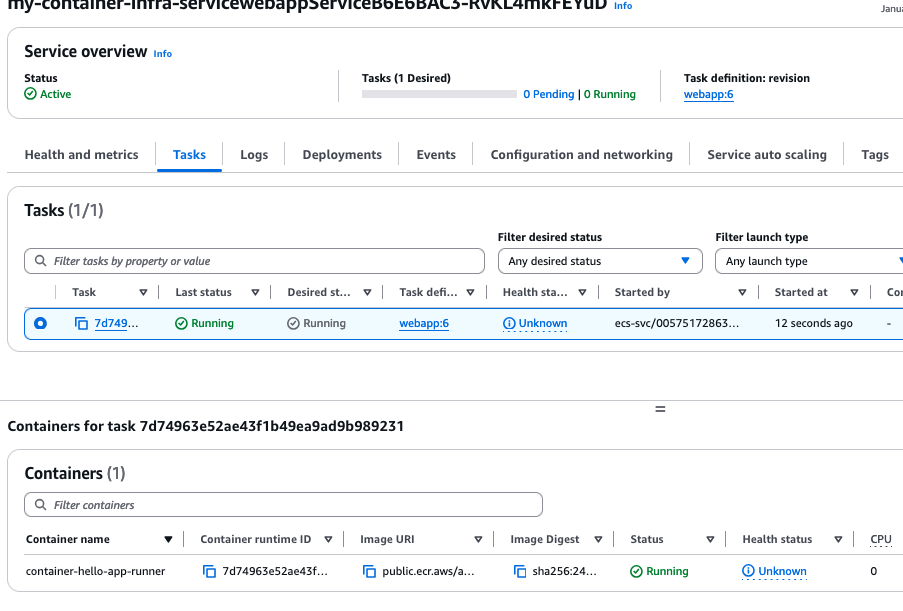
So now we are ready to test our update! Perform the same steps as before to update the number of tasks (i.e. desired count) to 1 for the service and check the status for the task started. It will go from PROVISIONING to PENDING, and in this case finally to RUNNING! Success!
Let us also double-check if we get any logsi under the Log tab..
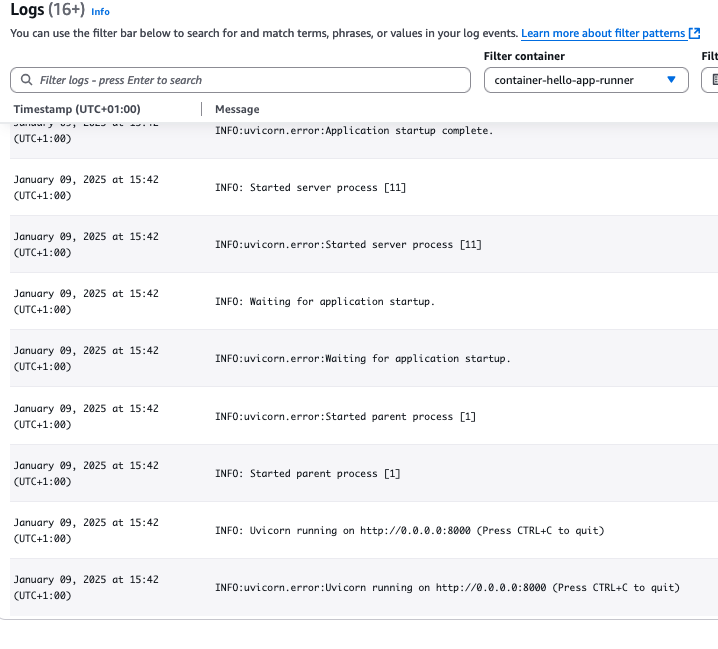
This is good! The service is running, and we have logs from it!
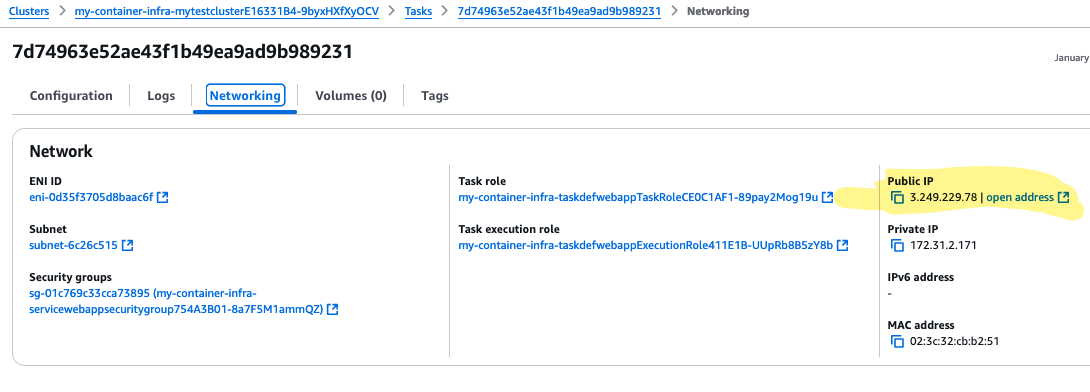
We have successfully deployed and started the service. You can confirm this by using the public IP address. We got to see that we get the default response from the web app.
Next, you can set the desired count in the add_service() function call, set a value 1, and verify that the service starts up and is accessible, with no manual steps needed.
You can also try to stop the task that is running then. After clicking the Stop button, it will stop within seconds. ECS will start a new task to replace the old one. It will not get the same IP address as the old task though, so even though it is accessible, it is not accessible from the same address. This is something we need to improve on.
6.4 Final words
In this part, we added the ability to provision a service and get that started automatically. We have some shortcomings in this, in that we do not maintain a fixed address to reach our web app. This is something we need to address later. We also learned that we do not get any logs by default and need to add a configuration entry for this as well.
In addition, we learned that ECS performs some health checks on the tasks in the service. In this case, we had to make it reachable from the internet for the health check to work.
So from our goal list we have a kind of ticked off another entry:
- Expose an endpoint for a web server for HTTP traffic from internet.
- Web server shall run in a container.
- The container itself shall not be directly reachable from internet.
- We should be able to have a service set up so that containers will automatically be started if needed.
- We should be able to build our custom solution for this web server.
- We should be able to get container images from a container registry.
- We do not care about managing the underlying server infrastructure that runs the containers. I.e., we will use Fargate.
In the upcoming chapters, we will address the remaining points in the goal list. We will also take a step back and think more about monitoring and structure, and how we can test that we get what we expect before we deploy. This will become more important once our solutions grow larger and more complex.
Don’t forget to use cdk destroy to remove the infrastructure you deployed!
AWS does not bill you for what you use, as much as what you forget to shut down.